

From Digitization to Intelligence: The Era of AI Agents

In the early days of digital transformation, the biggest advantage of adopting technology was digitizing manual processes—automating tasks, improving reporting, and enabling complex calculations. It was an era of replacing paper with pixels, spreadsheets with dashboards, and manual approvals with workflows. But today, we’ve entered a new paradigm. AI is no longer just supporting our work—it’s doing the work. We are now in the age of AI Agents, where intelligent software systems are reshaping how business applications like Dynamics 365 Finance & Operations (FO) and Business Central are built, deployed, and operated. What Are AI Agents? AI agents are smart, autonomous software services that combine three capabilities: Unlike a traditional bot that waits for prompts, agents take initiative. They analyse context, choose the right tools, and generate outcomes based on business goals. Example: Customer Service Agent Let’s see how these components work together: This isn’t just automation—it’s intelligent orchestration, where the agent thinks, decides, and acts like a digital coworker Building AI Agents in the Microsoft Ecosystem Microsoft provides multiple paths to create agents, tailored for different user types—from developers to business users. Azure AI Agent Service – For Developers & Architects The Azure AI Agent Service is Microsoft’s enterprise-grade solution for building and managing intelligent agents. Designed for developers and solution architects, this managed service provides a scalable and secure environment to create agents that integrate deeply with business systems. It is built on top of the OpenAI Assistants API, enhanced with Microsoft’s enterprise security, observability, and governance capabilities. With Azure AI Agent Service, you can combine large language models (LLMs) with enterprise data through Retrieval-Augmented Generation (RAG), enabling agents to ground their responses in reliable, domain-specific knowledge. It also supports function calling, giving agents the ability to interact with APIs, update records, trigger workflows, or even orchestrate complex business processes in Dynamics 365. For organizations that need mission-critical agents with compliance and scalability, Azure AI Agent Service acts as a complete factory for intelligent agents—offering tools, orchestration, and monitoring all in one place. Semantic Kernel – For Custom App Builders For developers who prefer full control and flexibility, Semantic Kernel is Microsoft’s open-source development kit for building highly customizable agents. Unlike a managed service, Semantic Kernel gives you the freedom to design how an agent reasons, orchestrates, and integrates with your applications. It is especially useful for creating multi-agent systems, where several specialized agents collaborate to handle complex workflows. Semantic Kernel supports a wide range of plugins and orchestration patterns, enabling developers to connect agents to external tools and services such as Azure AI Search, OpenAPI connectors, or Bing. This makes it an ideal choice when you want to embed intelligence directly into custom apps or enterprise solutions. Developers can decide exactly how the agent interprets inputs, what knowledge it uses, and how it interacts with different systems. In short, Semantic Kernel is the toolbox for builders who want to go beyond standard templates and design agents with precision and creativity. Copilot Studio – For Low-Code Makers Not every business has developers on hand to code advanced agents, and that’s where Copilot Studio comes in. Aimed at business analysts, consultants, and makers, this low-code platform allows users to create and deploy AI agents with minimal technical knowledge. Using a natural language interface, you can define how an agent should behave, configure its tasks, and connect it to your existing Microsoft 365 environment—including Teams, SharePoint, and Outlook. Copilot Studio also integrates seamlessly with the Power Platform, making it possible to connect agents with Power Automate flows or external data sources without writing code. This democratizes agent development, giving business teams the power to create assistants for HR, sales, finance, or support functions on their own. Whether it’s a simple HR query bot or a sales assistant that drafts responses, Copilot Studio provides the fastest path to getting intelligent agents into production.
AI Agents in Microsoft Business Applications: Dynamics 365 F&O, Business Central, CE & Power Platform

Microsoft’s Journey in Business Applications For the last decade, Microsoft has been making continuous investments in its business applications ecosystem, shaping the way enterprises of all sizes from SMEs to large corporations manage their operations. With Dynamics 365 Finance & Operations (F&O), Business Central, Customer Engagement (CE), and the Power Platform, Microsoft has built a state-of-the-art ERP and CRM landscape that delivers flexibility, scalability, and intelligence. These applications empower organizations to: In short, Microsoft’s ecosystem has become the backbone of modern enterprises, delivering both operational efficiency and strategic decision-making power. From Copilot to Agents: The Evolution To support users in daily operations, Microsoft introduced Copilot across its business applications. Copilot acts as a context-aware assistant, enabling users to: This was a major leap in productivity. However, while Copilot is an assistant, it still waits for user prompts. The next evolution is the introduction of Agents—autonomous, AI-powered entities that can act independently and carry out business workflows without constant user involvement. Copilot vs Agent Feature Copilot (Assistant) Agent (Autonomous Doer) Role Helps the user Acts on behalf of the user Behavior Responds to prompts Acts independently Scope Provides suggestions & insights Executes workflows & automates tasks Intelligence Context-aware Decision-making & adaptive Example “Show me unpaid invoices.” “Process supplier emails and update purchase orders.” In simple terms, Copilot is like a helpful colleague, while Agents are like digital employees who don’t wait for instructions—they just get the job done. Agents in Dynamics 365 Finance & Operations Microsoft has introduced Agent Management in Dynamics 365 F&O as a production-ready preview. These agents are designed to automate routine ERP processes and operate directly within the system. Key capabilities include: Microsoft has started introducing intelligent agents in Dynamics 365 Finance & Operations (F&O) that go beyond traditional automation and empower finance and procurement teams with AI-driven decision-making. These agents are designed to remove repetitive manual tasks, streamline operations, and accelerate financial processes. 1. Account Reconciliation Agent The Account Reconciliation Agent automates reconciliation tasks between subledgers and the general ledger. Traditionally, finance teams relied on SQL Server Reporting Services (SSRS) reports for reconciliation, which was a reactive and time-consuming approach. With this agent, the process shifts to a proactive experience. The Account Reconciliation workspace raises exceptions, and the intelligent agent evaluates these exceptions, providing recommended actions. This represents a significant step toward continuous financial close, improving both efficiency and accuracy for finance teams. 2. Financial Reconciliation Agent The Financial Reconciliation Agent simplifies reconciling two sets of financial data, often maintained in Excel workbooks. Instead of manually creating reconciliation rules, the agent uses AI to define rules automatically, perform the reconciliation, and generate a comprehensive report. What makes this agent more powerful is its ability to produce a generative AI summary of the reconciliation results, making financial reporting faster, more accurate, and easier to interpret. 3. Supplier Communications Agent In procurement, communication with suppliers can consume a large share of employees’ time. The Supplier Communications Agent in Dynamics 365 Supply Chain Management automates routine vendor interactions—such as handling emails about purchase orders, confirmations, and changes. By taking over these low-complexity but repetitive tasks, the agent allows procurement staff to focus on strategic, value-added activities. This not only increases productivity but also reduces procurement costs by streamlining communication and minimizing manual intervention. Agents in Dynamics 365 Sales Beyond finance and supply chain, Microsoft has also introduced agents for Dynamics 365 Sales to optimize lead management. Sales Qualification Agent Sales teams often face a high volume of inbound leads from websites, events, or webinars. Many of these leads remain idle in CRM due to manual qualification processes. The Sales Qualification Agent automates this lead qualification—helping sales reps quickly identify, score, and prioritize leads. The agent doesn’t replace human judgment but ensures that sales teams spend more time engaging with high-value prospects, instead of wasting hours on low-quality or irrelevant leads. Agents in Dynamics 365 Business Central Microsoft has taken automation to the next level in Business Central by introducing Sales Order Agents, which handle end-to-end order processing. The workflow is highly streamlined: This not only reduces manual workload but also enhances accuracy and response times, improving customer satisfaction and giving sales teams more time to focus on relationship-building. The Road Ahead Microsoft is not just adding AI to its business applications—it is transforming them into intelligent ecosystems where agents become trusted digital employees. From Finance & Operations to Business Central and the Power Platform, the shift from Copilot (assistants) to Agents (autonomous doers) marks the beginning of a new era in enterprise automation. Enterprises that embrace this shift will not only optimize operations but also unlock new levels of agility, efficiency, and innovation.
Exploring Microsoft Copilot Architecture
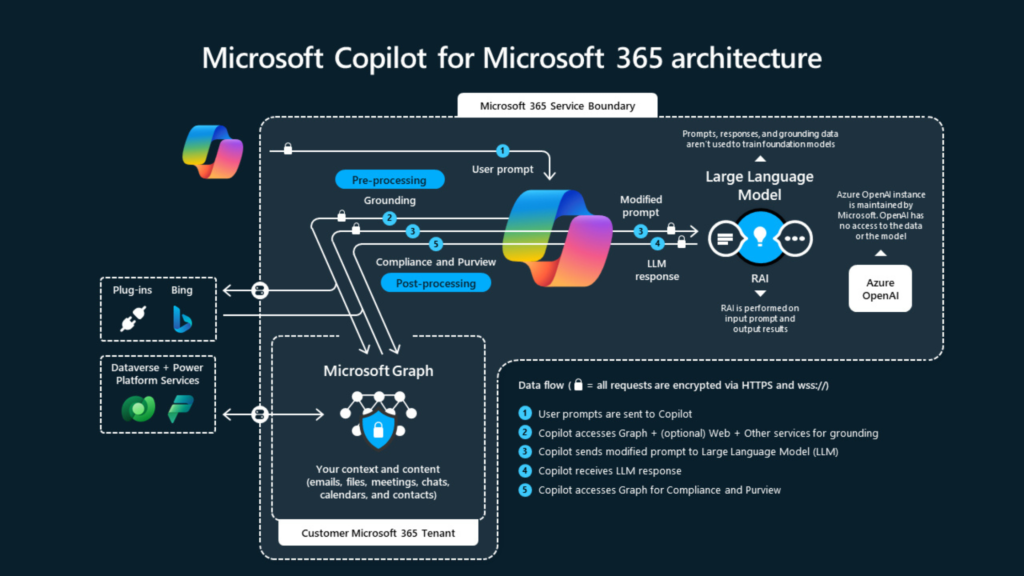
Microsoft Copilot isn’t just another AI tool; it’s a comprehensive platform designed to be your indispensable companion, enhancing productivity, fostering creativity, and facilitating information comprehension all through a user-friendly chat interface. The concept of Copilot emerged two years ago when Microsoft introduced GitHub Copilot, aiming to assist developers in writing code interactively. Microsoft then expanded its scope, integrating it with other services like Microsoft Office 365, Dynamics 365, Power BI, Windows, and Microsoft Fabric. Let’s explore the complexities of Copilot further, gaining insight into its diverse layers and the robust ecosystem of plugins that enhance its capabilities: The Plugin Ecosystem: Enhancing Copilot’s Capabilities Think of Copilot as a versatile toolkit, with plugins serving as specialized tools that enhance its functionality. These plugins enable Copilot to perform various tasks, frommaking reservations at your favorite restaurant to securely accessing proprietary company data. They empower Copilot to tap into external resources like Bing and Power Platform, broadening its scope and utility. Copilot’s Language Learning Models (LLMs) are trained on publicly available data. When extending Copilot for a specific company or organization, access to that organization’s system is necessary. Plugins act as bridges between large language models and websites or backend systems. Understanding Copilot’s Architecture: A Multi-layered Approach 1. Application Level: Where Interactions Take Place At the application level, the interface of Copilot is defined, where end-users interact with it. Here, users can engage in conversations, assign tasks, or seek assistance within a familiar chat environment. This simple Chatbotinterface processes user input using generative AI models. With Microsoft Copilot, users can also enable publicly available plugins at the application level. 2. AI Orchestration: The Cognitive Core The AI orchestration layer serves as the heart of Copilot. It interprets user intents from input, considering the conversation history between the user and copilot. After extracting intents, it orchestrates actions based on inferred intents, responsible for decision-making and task sequencing to fulfill user requests effectively. Microsoft have launched the developer took kit for the development of orchestration layer name semantic kernel. https://learn.microsoft.com/en-us/semantic-kernel/overview/ 3. Foundation and Infrastructure Level: The Backbone of Copilot At this level, Copilot’s technical framework is established, selecting optimal AI models, and managing data storage and retrieval mechanisms. Meta prompts are set to define the role and behaviour of Copilots, restricting and limiting responses from GPT models to relevant ones. This level also houses Copilot’s memory, crucial forretaining conversation history and facilitating context-aware interactions. AI model can be select through Azure Open AI services, it offers different generative AI models. Most commonly GPT 3.5 Turbo and GPT 4 I used for the copilots. Extending Copilot’s Reach: Customization Options Microsoft offers various options for tailoring Copilot to meet specific needs and preferences: Pre-made Plugins: For quick enhancements, pre-made plugins provide ready-made solutions. Those plugins can be consumed in Microsoft Copilot by enabling in the edge browser by sign-in with Microsoft account in the sidebar under the plugin option. Custom Plugin Development: Unique requirements can be met through custom plugins tailored to specific use cases and data sources. Custom plugins are developed by using the OpenAI schema. Plugins are considered as API which publish through OpenAI schema. Microsoft Copilot Studio: Microsoft has created a powerful tool based on low code no code concept to create a custom AI powered copilot. This is an intuitive tool for creating personalized Copilot experiences, allowing users to define behaviours, prompts, and integrations effortlessly. These copilots can be developed without need of developers. Azure OpenAI Services: Leveraging Azure’s infrastructure, users can deploy copilot with custom datasets, enhancing its understanding and responsiveness. Azure OpenAI services offers variety of generative AI models and plug n play method to deploy chatbot on Microsoft Copilot Studio. DIY Development: Microsoft have published a GitHub project to develop the custom copilot. By leveraging the Github project developers can develop a customize copilot. This project is implemented based using Semantic Kernal Framework. https://github.com/microsoft/chat-copilot Microsoft’s Copilot goes beyond the usual limits of AI help. It’s like a flexible and adaptable friend that fits perfectly into different tasks and areas of work. Whether it’s making daily tasks easier, sparking new ideas, or helping understand things better, Copilot is ready to support and guide you through everything.
How to enable new Microsoft teams – Public Preview!

New Microsoft Teams is just AWESOME, quick but useful post below shows how you have this preview feature to make your life EASY! Open Microsoft Teams admin center [Ask admin in your organization if you don’t have access] and follow path Teams > Teams update policies > Click on an existing policy or Create New > follow step 1 and step 2 below. Toggle Try the new teams to get yourself into NEW TEAMS world, you may chose to go back to classic (GA) version at any point of time. Let the change happen! Get it, Preview new Teams! Experience teams across tenants and get notifications from multiple tenants accounts. This is PRETTY COOL!
Electronic Reporting: Send vendor payments to external azure storage via X++

Electronic Reporting module in Microsoft Dynamics 365 Finance Operation lets you archive file generated by ER at SharePoint location and in Azure Storage as per this link Archive ER destination type – Finance & Operations | Dynamics 365 | Microsoft Learn. APIs can be used to check message status and read file from either location. Logic Apps or Power Automate can be used to make a call to APIs, read files, and perform required action. This post is not about how this can be done via integration 🙂 It’s been a while I haven’t written a full code base post (no low code :)) To send ER generated files directly to your provided Azure Blob Container, below is the sample class. using Microsoft.Azure; using Microsoft.WindowsAzure.Storage; using Microsoft.WindowsAzure.Storage.File; using Microsoft.WindowsAzure.Storage.Blob; using Microsoft.WindowsAzure.Storage.Auth; class DAX_ERVendPaymOutFieUploadHelper { /// <summary> /// Handles attachingFile event from Electronic reporting /// </summary> /// <param name = “_args”>Event args for event handler</param> [SubscribesTo(classStr(ERDocuManagementEvents), staticDelegateStr(ERDocuManagementEvents, attachingFile))] public static void ERDocuManagementEvents_attachingFile(ERDocuManagementAttachingFileEventArgs _args) { ERFormatMappingRunJobTable ERFormatMappingRunJobTable; Common common = _args.getOwner(); if(common.tableid == tableNum(ERFormatMappingRunJobTable)) { ERFormatMappingRunJobTable = ERFormatMappingRunJobTable::find(common.RecId); } if (!_args.isHandled() && ERFormatMappingRunJobTable.Archived == noyes::No) { DAX_ERVendPaymOutFieUploadHelper uploadHandler = DAX_ERVendPaymOutFieUploadHelper::construct(); uploadHandler.uploadFile(_args.getStream()); } } /// <summary> /// Creates an object of DAX_ERVendPaymOutFieUploadHelper class /// </summary> /// <returns>DAX_ERVendPaymOutFieUploadHelper class object</returns> public static DAX_ERVendPaymOutFieUploadHelper construct() { return new DAX_ERVendPaymOutFieUploadHelper(); } /// <summary> /// Uploads file to custom Azure blob container specified in parameters /// </summary> /// <param name = “_fileStream”>File stream to be uploaded</param> /// <returns>True if file uploaded successfully</returns> private boolean uploadFile(System.IO.Stream _fileStream) { boolean ret = true; // Custom parameters table to store Azure Storage and container info DAX_Parameters parameters = DAX_Parameters::find(); try { StorageCredentials credentials = new StorageCredentials(parameters.StorageAccountName, parameters.Key); CloudStorageAccount storageAccount = new CloudStorageAccount(credentials, true); CloudBlobClient blobClient = storageAccount.CreateCloudBlobClient(); CloudBlobContainer rootContainer = blobClient.GetContainerReference(parameters.ContainerName); if(!rootContainer.Exists(null, null)) { return Checkfailed(‘Azure storage parameters are not set up correctly.’); } CloudBlobDirectory directory = rootContainer.GetDirectoryReference(parameters.BankOutPaymFolder); CloudBlockBlob blockBlob = directory.GetBlockBlobReference(strFmt(‘VendOutPaym.xml’)); if (_fileStream.CanSeek) { _fileStream.Seek(0, System.IO.SeekOrigin::Begin); } blockBlob.UploadFromStream(_fileStream, null, null, null); Info(‘File uploaded’); } catch(Exception::Error) { ret = checkFailed(‘Error occurred while uploading the file’); } catch(Exception::CLRError) { ret = checkFailed(‘CLR Error occurred while uploading the file’); } return ret; }}
Download large bacpac (sandbox database) to DEV environment much faster

As the LCS website gets slower and slower and the database backups get bigger and bigger. Use AZCopy to download objects out of LCS asset library. it is an incredibly quickly vs manually downloading the files (>1min for a gig vs 1 hour+) Download AZCopy to the environment (https://docs.microsoft.com/en-us/azure/storage/common/storage-use-azcopy-v10?toc=/azure/storage/files/toc.json#download-azcopy) and user the PowerShell command: .azcopy copy “LCS SAS Link” “LocalPath“ D The only issue I noticed is that the local path had to be into a folder, not the root of the drive (so “C:Temp” not “C:” which is more related to windows security then anything else. Below is the example: Extract AzCopy zip folder to C:Temp folder Extract It took 3 minutes to download almost 18 GB of data file – WOW feeling 🙂
Get your Dynamics 365 FO tier 2 (sandbox) environment today!!

Pakistan User Group is hosting FREE training program for everyone covering Microsoft Business Application and Azure components of Microsoft EcoSystem from beginners to advance level. Register now if you have not yet and join us on Saturday 20th November at 4pm Pakistan Standard Time (GMT + 5). All details apart, this post is a quick guide to get your own Microsoft Dynamics 365 Finance Operations tier 2 environment FREE!! I will create step-by-step videos to explain all these steps in details, I know it requires detailed explanation. Subscribe https://www.youtube.com/c/DaxtureD365FO Let’s begin… Open this URL https://dynamics.microsoft.com/en-au/intelligent-order-management/overview/?ef_id=e0b92d13d85e177270894c83385bd79c:G:s&OCID=AID2200017_SEM_e0b92d13d85e177270894c83385bd79c:G:s&msclkid=e0b92d13d85e177270894c83385bd79c and click on Request a demo and sign up now Enter work or school email address (create new if you don’t have one – this can be gmail or hotmail account so don’t worry too much – it should be your and valid email as you will receive email confirmation on this account), upon entering your email account it will ask you set up a new account. Complete all steps and verify your account either via email or SMS. Get Started Choose region on next screen and Submit Log on to Lifecycle Services https://lcs.dynamics.com with an account you created above (e.g. I created this account 1DynamicsDaxture@1dynamics675.onmicrosoft.com). First time you will following screen Click on + sign to create new project (Select product of your choice – I have chosen Finance and Operations) Project is created, click on Project onboarding and follow the documentation to complete project onboarding. This is a must step before environments will get deployed. Comment to discuss more about this process with me. Upon project onboarding completion, the configure button will be enabled (note for this example, I have not completed the onboarding process hence the configure button is disabled) Configure new environment following MS docs article – any question again ping me directly. This will take less than an hour to deploy new sandbox (tier 2) environment for Finance Operations. This also creates a new environment in power platform, check it from this URL https://make.powerapps.com/environments Sign up for FREE on portal.azure.com for 1 month using same account 🙂 I know there are steps require more explanation, I will create short videos on all steps and share. Stay Tune!!
MS D365 FinOps: How to create new LCS project and deploy Tier 1 (DEV) VM – Even you are not a MS customer or partner :) – Part I

Scenario: You are willing to work on Microsoft Dynamics 365 Finance Operations product and want to get your hand dirty with some development. You are hearing so much about this product but never got a chance to work on this MS ERP. Andre wrote a detailed post on how you can setup a trial environment for MS D365 Finance Operations Solution: With this post I will explain a step-by-step guide on how; to create your own LCS project to deploy a new Tier 1 VM to log on to Azure Portal to access Power Platform environments to create your own power app and use other features to deploy solutions in Power Platform to integrate with Finance Operations NOTE: You would need Azure Subscription to deploy VM First create new domain to perform all above steps – its easy just follow following steps 1. Open this site Office 365 E3 in cognitive mode or as guest and go with Free Trial option 2. Fill in details – you can use your personal email or sign up for a new email account and use that one 3. Provide as much as information you can – it will be good for you 🙂 4. Choose verification method, I always select text me 5. Provide Once verified enter your business details and check the availability 6. Sign up and you are ready to use this account to perform all above steps mentioned under solution section Manage your subscription option will take you to Microsoft 365 admin center where you will have 25 free user license for the whole month. You can use this account to sign up for teams and enjoy all features for the whole month FREE!! Log on to LCS lcs.dynamics.com using above created account Create new project by clicking on + sign and fill information – product name should Finance and Operations Your LCS project is ready, click on hamburger sign and go to Project setting Under Organization and ownership the type should be either customer or partner which will be one of them based on the account you have used to log on to LCS. If your account is linked to a partner organization then this will be partner and it will be customer if your account is of type customer. Remember, the created account in post is not linked to either Partner or Customer so we cannot deploy any tier 1 environment in LCS as in order to connect to Azure portal with LCS the company account should be either customer or partner. So, we are blocked here 🙁 Here is the trick to convert this prospect account to customer account to unblock ourselves. Browse https://trials.dynamics.com/ and choose Finance and Operations, enter your new account and hit Get Started. This will deploy a new trial environment with demo data in next 30 minutes. Read Andre’s post to find the downside of this environment. After trial environment deployed, refresh project settings page (you can sign out and sign in again in) to see the changes where it has changed type from prospect to customer Now you are the customer so let’s continue our journey of completing our solution but this is it for this post and we will continue deploying cloud hosted environment through LCS in azure portal in next post.
Dual-write learning series – Dual-write initial sync is the data integrator

One of the features of the dual-write is initial sync where you copy data from the source app (Finance Operation OR DataVerse) to the target app (Finance Operation OR DataVerse) depending on the selection in Master for initial sync option. This initial sync is the Data Integrator service running behind the scene and copies your data over. You configure the application id for data integrator and add it both apps (Finance Operation OR DataVerse), I have documented it my previous post The Dual Write implementation – Part 2 – understand and action pre-requisites Master for initial sync can be either Common Data Service (Dataverse) or Finance and Operations apps. For example, If I choose Finance and Operations app in below example where I am syncing Functional Locations then all records will be copied from Finance and operations to Dataverse. Initial Sync is a full push means if an individual row fails to sync, you cannot resync only failed ones. If the initial synchronization only partially succeeds, a second synchronization runs for all the rows, not just the rows that failed to be synced during the initial synchronization. For example; 1st initial sync Run for 1000 records from FO to CDS à 700 passed and 300 failed 2nd initial sync Run will again run for 1000 records Do check Considerations for initial Sync from Microsoft Docs Initial Sync runs against all legal entities configured for dual-write. If you have entered a filter for a specific legal entity in a table map at Finance and Operations app side, as shown below as an example, this will not work for initial sync as it will run against all legal entities configured for dual write under environment details.
D365FO: Right click on any control at D365FO browser takes you directly to the control in AOT
Last week I explored very Interesting feature especially for developers where you right click on any field/control on the form and follow these steps. This opens the visual studio in non admin mod, Opens the correct form, and takes you directly at the control in AOT. NOTE: You can only get this feature within Development VM where your browser and Visual Studio are in same machine. I am at 10.0.14 but not sure when this great feature was available first 🙁